
Garden Boots

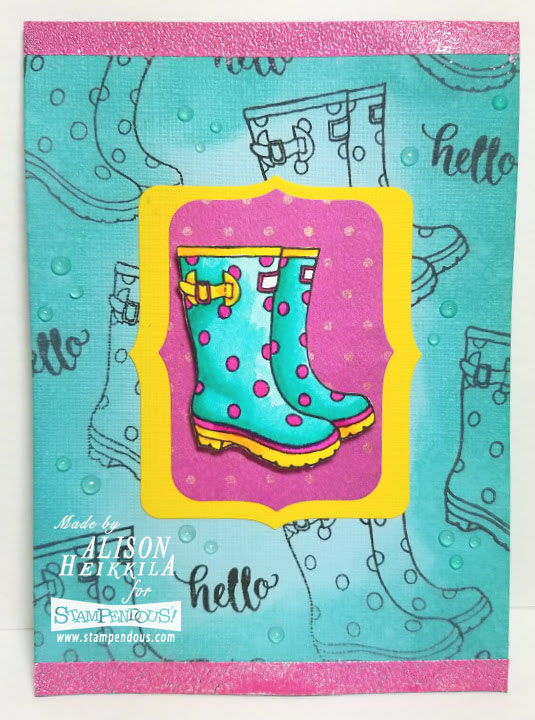
Hello! This week, the Stampendous team is sharing projects from the October 2017 and January 2018 catalogs that we haven't had a chance to share yet. I really love the Garden Boots set, and it is so perfect for Spring. 


Supplies:
Stampendous:
SSC1270: Garden Boots Perfectly Clear Set
SSC1272: Brushed Wishes
EP514: Bright Pink Embossing Powder
DCP1005: Fitted Frames Set A
DCP1006: Fitted Frames Set B

Other:
My Colors Cardstock: Sky, Fireflies
Bo Bunny: Pink Punch Vintage #12PPV951
Imagine: VersaFine Ink in Onyx Black, Tear It! Tape, 
Zig Clean Color Markers: 025, 027, 036, 042, 050, 052
Ranger: Distress Oxide Ink in Peacock Feathers, Ink Blending Tool
Nuvo Jewel Drops in Sea Breeze
Canson Mixed Media Paper
Scrapbook Adhesives: EZ Runner, Foam Squares

Directions:
1. Stamp the Garden Boots on to Canson Mixed Media Paper with VersaFine Ink in Onyx Black. 

2. Color the image with the Zig Clean Color Markers listed.

3. Fussy cut the boots out.

4. Die cut the Large H Fitted Frame with Pink Punch Vintage Cardstock.

5. Die cut a piece of Fireflies cardstock with the Small V Fitted Frame.

6. Create the card base out of Sky cardstock, cut to the size of 5 1/2" x 8."

7. Stamp the Garden Boots and the Brushed Hello all over the card base with VersaFine ink. 

8. Apply Distress Oxide ink in Peacock Feathers to the outside edge of the card base using an Ink Blending Tool. 

9. Apply Tear It! Tape along the top and the bottom of the card base. 

10. Sprinkle tape with Bright Pink embossing powder and heat set. 

11. Glue die cuts together with the EZ Runner.

12. Attach the boots to the die cuts with foam squares. 

13. Attach the die cut layers to the card base.

14. Apply Nuvo Jewel Drops randomly on the card base. Let dry.

Please be sure to visit the Stampendous Blog so that you don't miss any of the fabulous projects that the rest of the team has created. Thanks for stopping by. Have an inspiring day!

Comments

Popular posts from this blog

February Smeared & Smudged Sketch Challenge

The new Smeared & Smudged challenges are up and ready for you to participate in! I got instantly inspired by Kelli’s card sketch for the month, as I have been working with different ideas for my next “Tarot Card.” Haha! That’s actually pretty funny! If you’ve been checking in over the past couple of weeks, you may have seen my Misty Benson Tarot Set 1 ( Smeared Ink ) cards. I’ve used The World and The Fool so far. Today, I bring you Death. Don’t worry…it’s actually a joyful image…one that I intend to use a lot! First, here’s the sketch. I flipped it and changed the ribbon and embellishment a bit. Can I just start off by saying that it is quite nerve wracking to slice your image??? I have done it a few times in the past, but I always get butterflies when I attempt it again. I colored the image and the card itself using nothing but Distress Inks and my Cut-n-Dry Nibs. My skull button at the top has been colored with Alcohol Inks.   The colors look a little off to m

Christmas in July with Imagine Crafts & Stencil Girl!

Hello! Have you heard? The Imagine AIRs have been hopping with Stencil Girl! If you have been here before, you know I loooove me some stencils, so this collaboration was very exciting for me! The teams are hopping for 3 consecutive Saturdays, and this is week 2. I have the entire list of hop links at the bottom of the post. Be sure you don't miss anyone! I decided to to create an extra large gift tag with my new stencils. Using red cardstock, I taped down the Journal Texture #8 Stencil  and inked it up with Golden Glitz Delicata ink . I promise you, this is the BEST gold ink you will ever use! The Journal stamp only has 2 diamonds on it (it's a 4x4" stencil), so after I inked up the first pair, I moved over the stencil, lined it up, and inked again. Next I wanted to do something textural with the Urban Insiders Star . So I took some evergreen cardstock, taped down the star, and slathered on some yummy Iridescent Green Creative Medium . After the medium dried, I ga

House Mouse Hop: Nurse Mouse

Hello! I am excited to bring you my first of two posts today. This post is for the House Mouse & Friends Blog Hop. My second will be for Aurora Wings. You can click HERE to see that post. But don't leave yet! Read to the bottom of my post to find out how you can have a shot at winningMy House Mouse project features the adorable Nurse Mouse stamp. My full instructions and supply list is below. Supplies: Stampendous : HMP62 : Nurse Mouse DWLX7026 : Chevron Stencil STF082: VersaFine Onyx Black Ink Others : My Colors Cardstock : Ocean Side Zig Clean Color Markers: 010, 020, 024, 028, 029, 050, 052, 064, 065, 069, 071, 072, 090, 091, 092, 094, 095, 096, 098, 222, 260, 302, 900, 901, 902 Imagine: Silver irRESISTable Pico Embellisher, StazOn White Opaque, Sponge Dauber Canson Mixed Media Cardstock Ranger: Water Brush Beacon Adhesives : Zip Dry Glue Red Cardstock: unknown Directions: 1. Stamp the image with VersaFine on to Mixed Media paper. This paper holds wa