Hello! It's time for Day 18 of the 31 Days of Halloween. Today I have a little tutorial for you that I created for Imagine. For those of you outside the USA, Imagine is the American side of Tsukineko. You are probably already familiar with their inks, sprays and markers. I adore their products and I love being an Artist in Residence for them. But on to today's project!
My card today features the Cappuccino Delight Kaleidacolor ink pad. If you haven't seen these before, I urge you to take a peek at the link above. .Kaleidacolor is Imagine's multicolor (“rainbow”) dye inkpad for paper crafting of all kinds. You can even get empty pads and create your own rainbow! Let me break down the details for you.
Supplies:
Imagine:
Cappuccino Delight Kaleidacolor Ink Pad
Ink Potion No. 9
Rich Cocoa and Desert Sand Memento Ink
Gold irRESISTable Spray
Other:
Sizzix and Tim Holtz Stamp and Die set: 659374
Hero Arts: Dreams are Made stamp set
Stampendous Fitted Frames Set A
Watercolor Paper
Smooth Cream colored cardstock
Brayer
Your favorite adhesieve
Directions:

1. Push together the pads of the Kalediacolor and roll out the ink on to a brayer. Spray the brayer several times (spinning it as you go) with Ink Potion No. 9 to help the ink stay wet and to encourage the migration of color.

2. While the ink is drying on the watercolor paper (you don't have a very long wait), stamp the owls (or other fun Halloween stamp) on smooth cream colored cardstock using Rich Cocoa Memento. Die cut with Sizzix machine.

3. Take the background and lay the owls randomly on top of it. Allow some to overhang. Be sure to have their directions vary slightly for a little more whimsy. You can see this in the left photo below.

4. Glue down the owls, remembering to leave them hanging off the edge. Once the owls are glued, you can trim off the excess, as seen in the middle photo above. Now you can take those pieces and add them to empty spots on the background as I did in the photo on the right.

5. Spray the background with Gold irRESISTable Spray and let dry.

6. Stamp the sentiment using the same Kaleidacolor ink as before. Be sure to push the pads together. I wanted a vertical ombre effect, so I inked my stamp as in the photo above. Then I stamped it on to the same cardstock I used for the owls.

7. Die cut the sentiment. I used the Large "L" Fitted frame from Stampendous. Using Desert Sand Memento, I tapped the pad lightly on to my sentiment. The ink pad creates a really nice texture on the paper. Then I added Rich Cocoa Memento to the edges.
8. Ink the card base with Desert Sand Memento and attach the layers together.

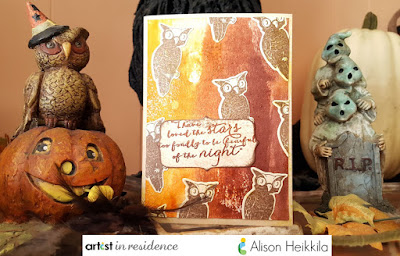
Here is the completed card. Please be sure to visit the rest of the Wicked Bloggers. They are all listed in my side bar. Thanks for stopping by. Have a creeptastic day!

My card today features the Cappuccino Delight Kaleidacolor ink pad. If you haven't seen these before, I urge you to take a peek at the link above. .Kaleidacolor is Imagine's multicolor (“rainbow”) dye inkpad for paper crafting of all kinds. You can even get empty pads and create your own rainbow! Let me break down the details for you.
Supplies:
Imagine:
Cappuccino Delight Kaleidacolor Ink Pad
Ink Potion No. 9
Rich Cocoa and Desert Sand Memento Ink
Gold irRESISTable Spray
Other:
Sizzix and Tim Holtz Stamp and Die set: 659374
Hero Arts: Dreams are Made stamp set
Stampendous Fitted Frames Set A
Watercolor Paper
Smooth Cream colored cardstock
Brayer
Your favorite adhesieve
Directions:

1. Push together the pads of the Kalediacolor and roll out the ink on to a brayer. Spray the brayer several times (spinning it as you go) with Ink Potion No. 9 to help the ink stay wet and to encourage the migration of color.

2. While the ink is drying on the watercolor paper (you don't have a very long wait), stamp the owls (or other fun Halloween stamp) on smooth cream colored cardstock using Rich Cocoa Memento. Die cut with Sizzix machine.

3. Take the background and lay the owls randomly on top of it. Allow some to overhang. Be sure to have their directions vary slightly for a little more whimsy. You can see this in the left photo below.

4. Glue down the owls, remembering to leave them hanging off the edge. Once the owls are glued, you can trim off the excess, as seen in the middle photo above. Now you can take those pieces and add them to empty spots on the background as I did in the photo on the right.

5. Spray the background with Gold irRESISTable Spray and let dry.

6. Stamp the sentiment using the same Kaleidacolor ink as before. Be sure to push the pads together. I wanted a vertical ombre effect, so I inked my stamp as in the photo above. Then I stamped it on to the same cardstock I used for the owls.

7. Die cut the sentiment. I used the Large "L" Fitted frame from Stampendous. Using Desert Sand Memento, I tapped the pad lightly on to my sentiment. The ink pad creates a really nice texture on the paper. Then I added Rich Cocoa Memento to the edges.
8. Ink the card base with Desert Sand Memento and attach the layers together.

Here is the completed card. Please be sure to visit the rest of the Wicked Bloggers. They are all listed in my side bar. Thanks for stopping by. Have a creeptastic day!
Comments
The colors in the background
are wonderful.
thanks for sharing.
Love all the orange!
Great background and great sentiment.