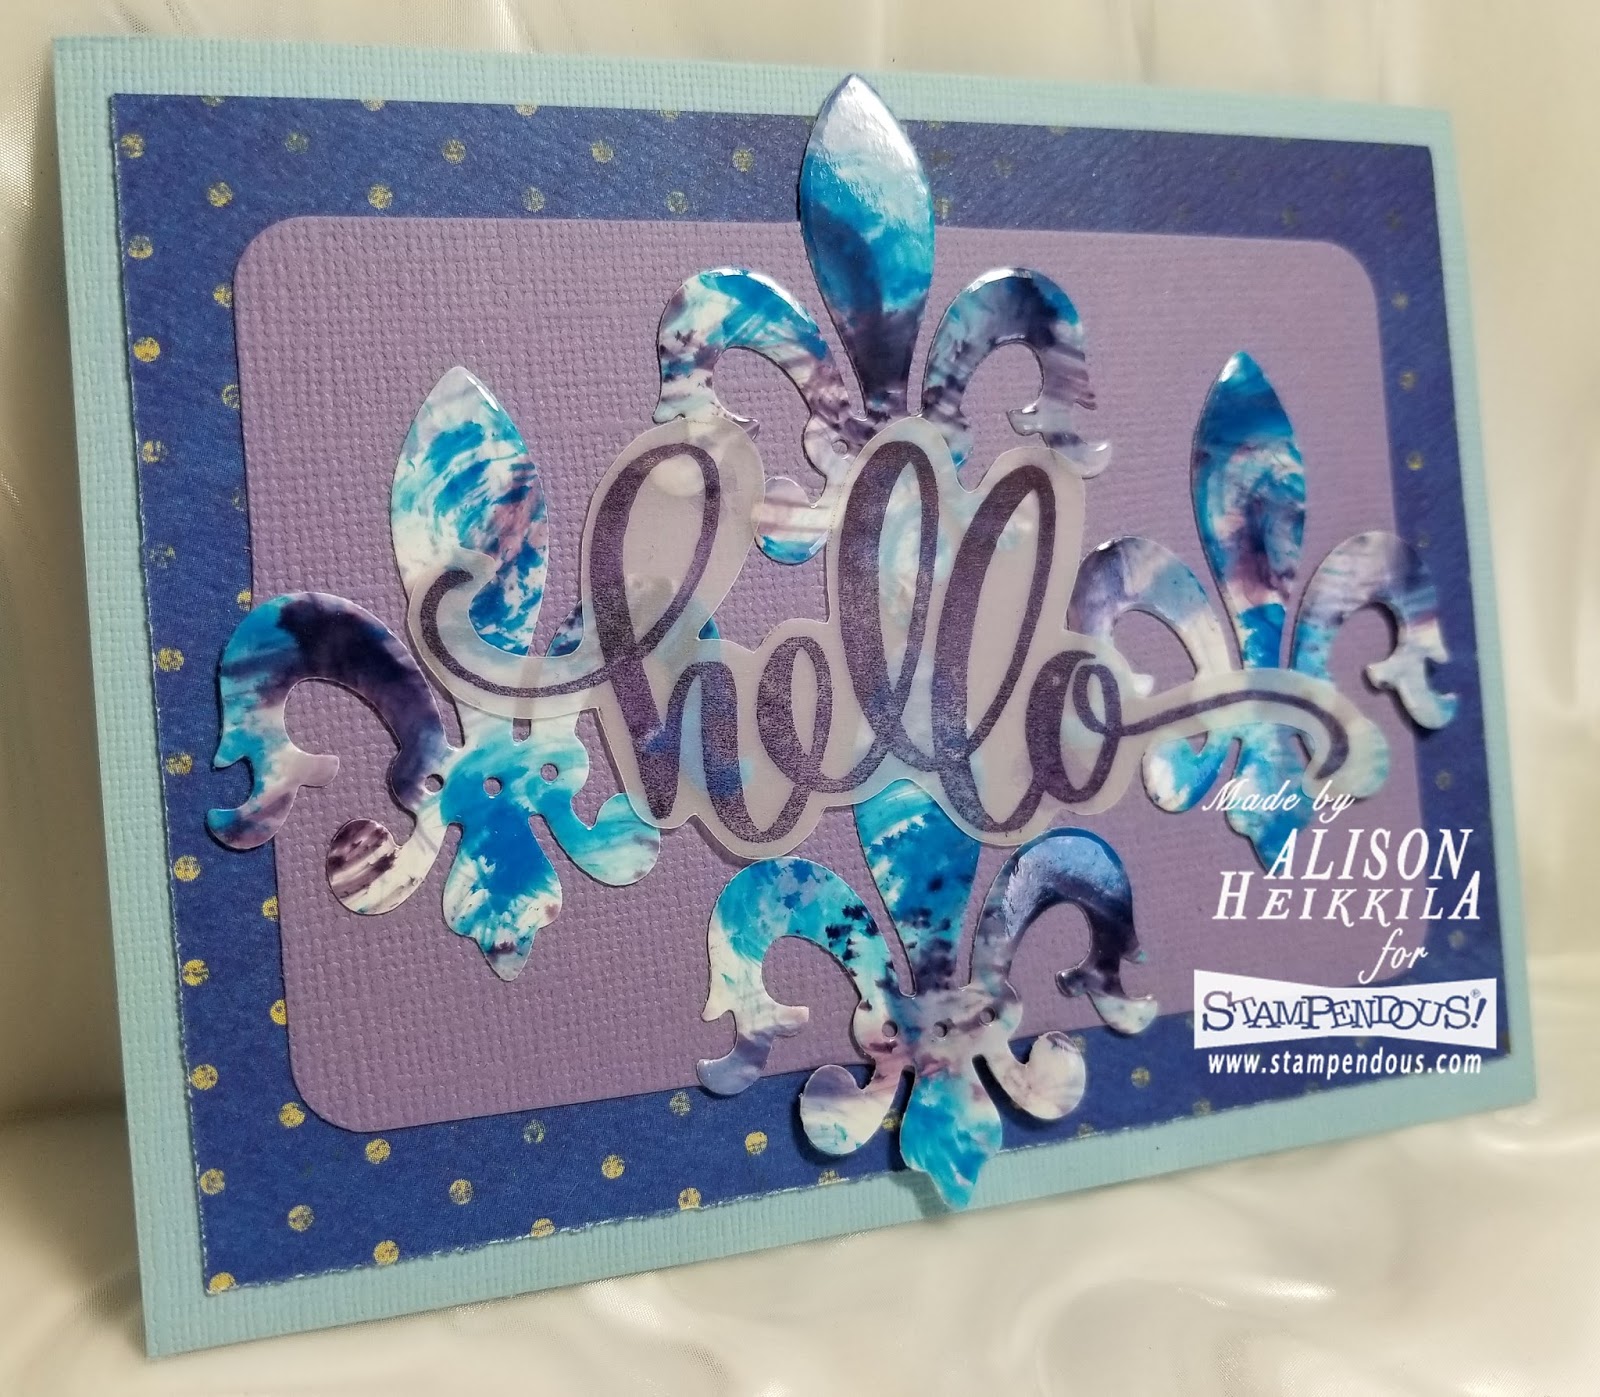
Hello! This week, the Stampendous team is sharing projects featuring some of the new Parisian themed stamps and dies. Before I get to my card, I wanted to let you know that I am participating in the very first Doodles Paper Playground Blog Hop, and i would love it if you could check out my other post HERE. I promise, it's worth it! On to Stampendous... For my project, I decided to work with the Fleur de Lis die that is in the Paris Bonjour die set. There is no accompanying stamp for it, so I decided to use alcohol inks to create interesting patterns for my die cuts. Also, I really wanted to use the new "hello" stamp, and have it look as though it had been die cut. I simply traced the full stamp on to my piece of vellum and fussy cut it out. Now it looks like it has been die cut! My full instructions are below.

Supplies:
Stampendous:
DCS5105: Paris Bonjour Die Cut Set
SSC1283: Big Words Thanks
DCP1006: Fitted Frames Set B
Other:
My Colors Cardstock: Sky
Bo Bunny: 12BV807- Blueberry Vintage Double Dot Cardstock
Ranger: Alcohol Ink in Eggplant, Stonewashed, Sailboat Blue. Ink Blending Tool
Imagine: StazOn Ink in Royal Purple, On Point Glue
HP Glossy Photo Paper
Scrapbook Adhesives: E-Z Runner
Vellum
Lavender Cardstock

Directions:
1. Apply a few drops of each alcohol ink to a piece of foam/felt on an Ink Blending Tool.
2. On a piece of Glossy Photo Paper, apply alcohol inks using a tapping or swirling motion. Do not over blend.
3. After the paper has dried, die cut 4 Fleur de Lis.
4. Die cut a piece of lavender cardstock using the Large "P" Fitted Frame.
5. Create the card base out of Sky Cardstock, cut to 4 1/4" x 11."
6. Cut a mat out of Blueberry Vintage cardstock (I used the Double Dot side), cut to 3 3/4" x 5 1/4."
7. On a piece of vellum, stamp the "Hello" with Royal Purple Staz On.
8. After the ink has dried on the sentiment, place the (uninked) stamp back on top of the image.
9. Trace around the stamp itself with a pencil. This will give you a nice border.
10. Fussy cut around the traced line.
11. Glue all layers, except the vellum, with the E-Z Runner.
12. Adhere the vellum sentiment with On Point Glue. Try to only add adhesive where the stamped image is, to prevent the glue from showing.

I hope you have enjoyed all of the projects you've seen this week. If you've missed any days, please be sure to head over to the Stampendous Blog to see more. Thanks for stopping by. Have an inspiring day!

Stampendous:
DCS5105: Paris Bonjour Die Cut Set
SSC1283: Big Words Thanks
DCP1006: Fitted Frames Set B
Other:
My Colors Cardstock: Sky
Bo Bunny: 12BV807- Blueberry Vintage Double Dot Cardstock
Ranger: Alcohol Ink in Eggplant, Stonewashed, Sailboat Blue. Ink Blending Tool
Imagine: StazOn Ink in Royal Purple, On Point Glue
HP Glossy Photo Paper
Scrapbook Adhesives: E-Z Runner
Vellum
Lavender Cardstock

Directions:
1. Apply a few drops of each alcohol ink to a piece of foam/felt on an Ink Blending Tool.
2. On a piece of Glossy Photo Paper, apply alcohol inks using a tapping or swirling motion. Do not over blend.
3. After the paper has dried, die cut 4 Fleur de Lis.
4. Die cut a piece of lavender cardstock using the Large "P" Fitted Frame.
5. Create the card base out of Sky Cardstock, cut to 4 1/4" x 11."
6. Cut a mat out of Blueberry Vintage cardstock (I used the Double Dot side), cut to 3 3/4" x 5 1/4."
7. On a piece of vellum, stamp the "Hello" with Royal Purple Staz On.
8. After the ink has dried on the sentiment, place the (uninked) stamp back on top of the image.
9. Trace around the stamp itself with a pencil. This will give you a nice border.
10. Fussy cut around the traced line.
11. Glue all layers, except the vellum, with the E-Z Runner.
12. Adhere the vellum sentiment with On Point Glue. Try to only add adhesive where the stamped image is, to prevent the glue from showing.
I hope you have enjoyed all of the projects you've seen this week. If you've missed any days, please be sure to head over to the Stampendous Blog to see more. Thanks for stopping by. Have an inspiring day!
Comments
<3 J
jwoolbright at gmail dot com
HerPeacefulGarden.blogspot.com
Love it!
Sue in Ohio
of St. Louis, MO. We don't have
the Eiffel Tower but it will still
feature on our greeting cards.
The card is great.
thanks for sharing
Illinois
txmlhl(at)yahoo(dot)com