Hello out there! It's already Day 11 of the Smeared & Smudged 31 Days of Halloween. I have a really fun (albeit not so creepy) card to share with you today. I used some really fun and versatile stamps and dies from Stampendous. Unfortunately, I only have 2 photos, and I no longer have the card, so I couldn't take any more.

Here's the front of the card. I used the brooms from the Cling Create Winter set. Yup. Winter. The rest of the set has snowman parts. It's really cute....but the broom is just what I needed for this Halloween card. I used the Create Winter Die set to cut the broom out quickly and easily. I use this set for the inside too.....let's see if you can figure out where!

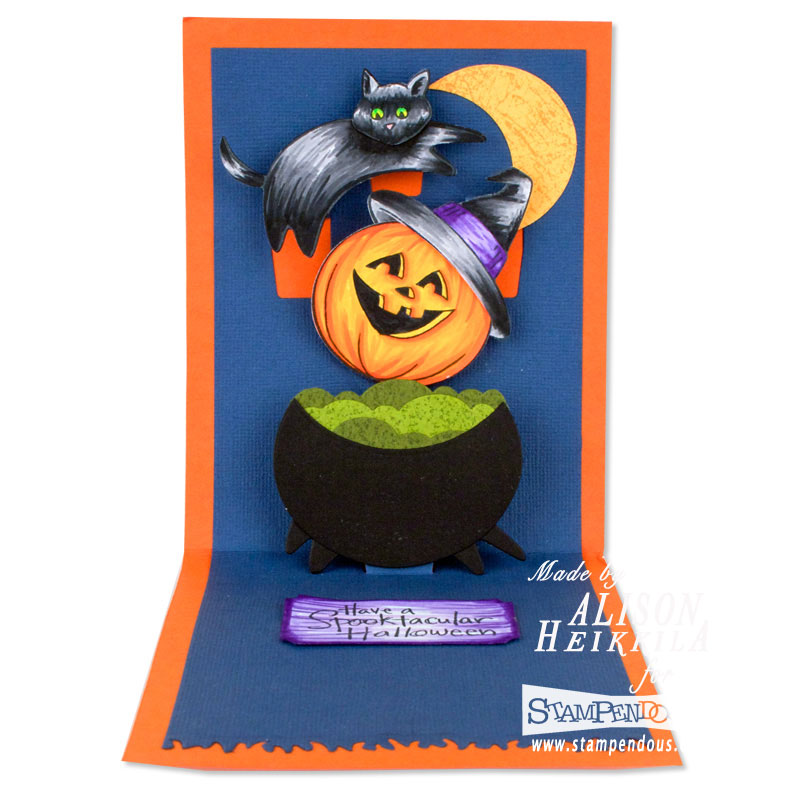
Here's the inside of the card. Isn't it fun? I wish you could see the dimension. Stampendous has this fantastic Pop Up Die set that makes this card possible. Most of the inside elements were stamped with the Cling Create Fall set, and then cut out with the Create Fall Die set. I colored the cat, pumpkin, hat and exterior broom with my Tombow watercolor markers.
I used some fun tricks to create some of the elements. For starters, I used the large oval die in the Create Fall Die set to make the cauldron bowl. I cut the oval, then I placed the die back on part of it to cut the top. For the legs.....I simply used the cat's body (the head is a separate die), and tucked it under the cauldron bowl. Same idea to create the moon, I just removed more of the original oval. The funky border on the bottom was made with the grass die also in the Create Fall Die set. The bubbling mixture in the cauldron was made with........the snow bank dies from the Create Winter Die set. And some green double sided cardstock. See? Super versatile! My sentiment is from the Spooky House stamp set and I cut it out with one of the dies from the Pop Up Die set. This card was a lot of fun to make, and it was fun to find unusual ways to use each of the components. Please be sure to visit the Wicked Bloggers that are all listed in my sidebar. Thanks for stopping by. Have a creeptastic day!

Here's the front of the card. I used the brooms from the Cling Create Winter set. Yup. Winter. The rest of the set has snowman parts. It's really cute....but the broom is just what I needed for this Halloween card. I used the Create Winter Die set to cut the broom out quickly and easily. I use this set for the inside too.....let's see if you can figure out where!
Here's the inside of the card. Isn't it fun? I wish you could see the dimension. Stampendous has this fantastic Pop Up Die set that makes this card possible. Most of the inside elements were stamped with the Cling Create Fall set, and then cut out with the Create Fall Die set. I colored the cat, pumpkin, hat and exterior broom with my Tombow watercolor markers.
I used some fun tricks to create some of the elements. For starters, I used the large oval die in the Create Fall Die set to make the cauldron bowl. I cut the oval, then I placed the die back on part of it to cut the top. For the legs.....I simply used the cat's body (the head is a separate die), and tucked it under the cauldron bowl. Same idea to create the moon, I just removed more of the original oval. The funky border on the bottom was made with the grass die also in the Create Fall Die set. The bubbling mixture in the cauldron was made with........the snow bank dies from the Create Winter Die set. And some green double sided cardstock. See? Super versatile! My sentiment is from the Spooky House stamp set and I cut it out with one of the dies from the Pop Up Die set. This card was a lot of fun to make, and it was fun to find unusual ways to use each of the components. Please be sure to visit the Wicked Bloggers that are all listed in my sidebar. Thanks for stopping by. Have a creeptastic day!
Comments
Thanks for the fun card!!!
The brooms are cute.
thanks for sharing
Illinois