
Flowers and Day of the Dead: Day 13 of the 31 Days of Halloween

I enjoyed Saturday's post so much, that I decided to go with another Day of the Dead project. This time, my feature image is from Dilly Beans. And, since I am double posting with Dreamweaver Stencils today, I used their gorgeous Corner Flowers stencil as another focal point.

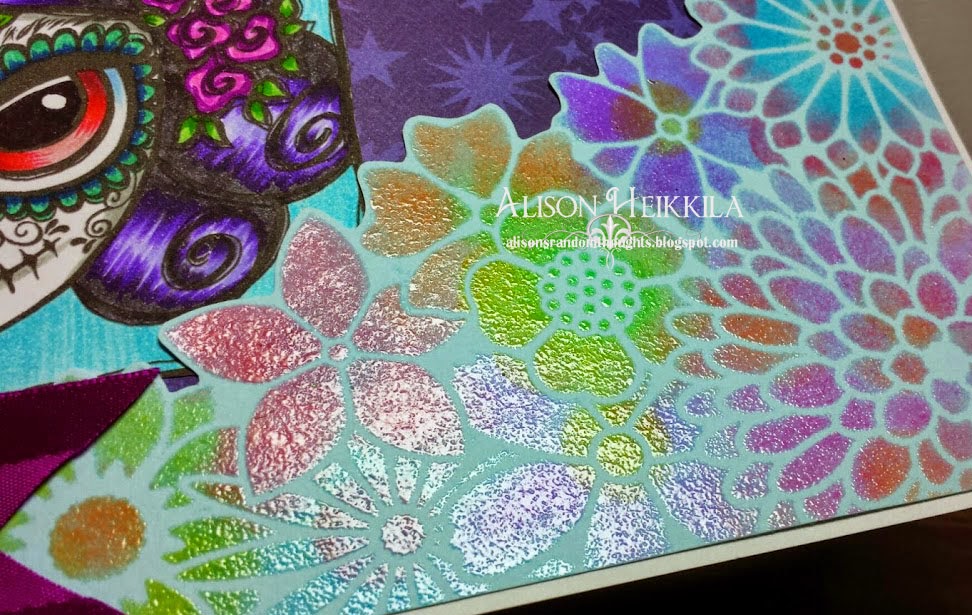
I colored this beautiful image from Dilly Beans first, with my watercolor markers.


Then, I started to play with my stencil! I used Radiant Neon inks (frm Imagine Crafts), and sponge daubers to apply them.

Then, I embossed the flowers with a clear powder. I love the texture and shine the flowers have now.

I used 2 different ribbons from Maya Road (see the puffy blue trim at the top?), and they finished this card off. My post for Dreamweaver today is verrrry different from this one. I hope you like it! Please be sure to check out the rest of the 31 Days of Halloween Wicked Bloggers. They are all listed in my side bar. Thanks for stopping by. Have a creep-tastic day!

Comments

TangledBlueRose said…
Love your Day of the Dead girl! Awesome colors! The flowers, embossed are stunning! Great ribbon. Both your projects today are wonderful!~kim
Laura S Reading said…
Such beautiful colors. I love how it all sparkles and shines.
Again, perfect choice of hair color.
DonnaMundinger said…
WOW! that corner stencil is just perfect with the image. SOOO beautiful, Alison! xxD
Unknown said…
Gorgeous coloring of that Dilly Beans image and the stenciling is fantastic too! Lovely card.
My Side of Oz said…
I love this DOD image and your coloring is soooo gorgeous! The stamped flowers are lovely!
My Side of Oz said…
I love this DOD image and your coloring is soooo gorgeous! The stamped flowers are lovely!
Unknown said…
Holy moly look at all that color and shine from the embossing powder phenomenal
maureenjscott said…
Cute card! love the DB image and that stenciled corner is awesome! love the colours, mo x
Julia said…
Love the Day of the Dead girl! Gorgeous coloring of that Dilly Beans image. That stencil is beautiful.
Julia said…
Love the Day of the Dead girl!Gorgeous coloring of that Dilly Bean image and that stencil is awesome.
Oooo what a fabulous DOTD card, that ghoul is to die for, love her!
Christine Kiehl said…
What a nice card you crafted to share with us! Not sure or not, but the hair is a good title for a great ard
Beautiful. Love how you colored her and the shimmery flowers.
Susan Renshaw said…
Beautiful colouring and gorgeous stencilling!
Steph said…
Absolutely gorgeous! She's colored so beautifully and that corner stencil is just amazing!

Popular posts from this blog

February Smeared & Smudged Sketch Challenge

The new Smeared & Smudged challenges are up and ready for you to participate in! I got instantly inspired by Kelli’s card sketch for the month, as I have been working with different ideas for my next “Tarot Card.” Haha! That’s actually pretty funny! If you’ve been checking in over the past couple of weeks, you may have seen my Misty Benson Tarot Set 1 ( Smeared Ink ) cards. I’ve used The World and The Fool so far. Today, I bring you Death. Don’t worry…it’s actually a joyful image…one that I intend to use a lot! First, here’s the sketch. I flipped it and changed the ribbon and embellishment a bit. Can I just start off by saying that it is quite nerve wracking to slice your image??? I have done it a few times in the past, but I always get butterflies when I attempt it again. I colored the image and the card itself using nothing but Distress Inks and my Cut-n-Dry Nibs. My skull button at the top has been colored with Alcohol Inks.   The colors look a little off to m

Christmas in July with Imagine Crafts & Stencil Girl!

Hello! Have you heard? The Imagine AIRs have been hopping with Stencil Girl! If you have been here before, you know I loooove me some stencils, so this collaboration was very exciting for me! The teams are hopping for 3 consecutive Saturdays, and this is week 2. I have the entire list of hop links at the bottom of the post. Be sure you don't miss anyone! I decided to to create an extra large gift tag with my new stencils. Using red cardstock, I taped down the Journal Texture #8 Stencil  and inked it up with Golden Glitz Delicata ink . I promise you, this is the BEST gold ink you will ever use! The Journal stamp only has 2 diamonds on it (it's a 4x4" stencil), so after I inked up the first pair, I moved over the stencil, lined it up, and inked again. Next I wanted to do something textural with the Urban Insiders Star . So I took some evergreen cardstock, taped down the star, and slathered on some yummy Iridescent Green Creative Medium . After the medium dried, I ga

House Mouse Hop: Nurse Mouse

Hello! I am excited to bring you my first of two posts today. This post is for the House Mouse & Friends Blog Hop. My second will be for Aurora Wings. You can click HERE to see that post. But don't leave yet! Read to the bottom of my post to find out how you can have a shot at winningMy House Mouse project features the adorable Nurse Mouse stamp. My full instructions and supply list is below. Supplies: Stampendous : HMP62 : Nurse Mouse DWLX7026 : Chevron Stencil STF082: VersaFine Onyx Black Ink Others : My Colors Cardstock : Ocean Side Zig Clean Color Markers: 010, 020, 024, 028, 029, 050, 052, 064, 065, 069, 071, 072, 090, 091, 092, 094, 095, 096, 098, 222, 260, 302, 900, 901, 902 Imagine: Silver irRESISTable Pico Embellisher, StazOn White Opaque, Sponge Dauber Canson Mixed Media Cardstock Ranger: Water Brush Beacon Adhesives : Zip Dry Glue Red Cardstock: unknown Directions: 1. Stamp the image with VersaFine on to Mixed Media paper. This paper holds wa