It’s been a few days, but it’s time to get back in the swing of things! I have some exciting posts coming up, including this one! Hope you enjoy one of my latest creations!
You may recall the bracelet I made using Bombshell Stamps in the beginning of December. Click HERE if you missed that post. I got an amazing response from so many people that I knew I needed to make more. So I started off with the following one, and I made it for my dear friend, Alex.

I used the same methods as I did for the first bracelet… Lots of Mod Podge, Staz-On, Distress Inks, and of course…my gorgeous Bombshell stamps!
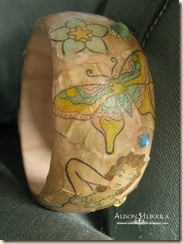
I thought that the Butterfly Queen set would make an awesome bracelet because There are so many images in this set that are begging for color! I think the butterflies came out so pretty, and there are so many different Distress Ink colors, the options are endless. Here, I went for a light, airy and magical vibe.

Of course, I needed some rhinestones to make this baby pop even more. I chose matte stones, so that it would not only keep the bracelet looking old, but they wouldn’t take away from the stamped images.

Here you can see the size of the bracelet against my hand. It’s about 2” wide. I had a blast making this bracelet, and I will certainly be making more using some of my other fabulous sets!!!
Comments