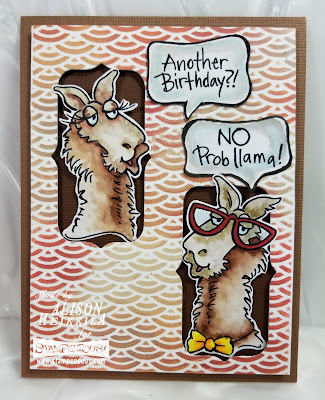
Greetings! This week, the Stampendous Team has been featuring projects made with their special Q-Sets. I decided to work with the set called, "No Probllama," as I love llamas. I also incorporated some stenciling, which if you've visited me before, you know how much I enjoy doing that. Check out my full instructions on how to make this card below.
 Supplies:
Stampendous:
QS5015: No Probllama
DCP1005: Fitted Frame Set A
DWLJ813: Fan Pattern Metal Stencil
MPW811: Mixed Media White Paper
DWNHB-9: 3/8" Stencil Brush
Other:
Bazzill: Chocolate cardstock, light brown cardstock
Imagine: VersaMagic in Wheat, Sage, Pumpkin Spice, & Red Brick, VersaFine Clair Ink in Nocturne, On Point Glue
Zig Clean Color Real Brush Pens: 050, 051, 052, 064, 065, 075, 230, 260, 302, 303, 901
Faber-Castell: Brush Tip PITT Pen in black
Canson: Mixed Media Paper
Scrapbook Adhesives: EZ Runner
Craft Foam

Directions:
1. Stamp the llamas and sentiments on Canson's Mixed Media Paper with VersaFine Clair Ink.
2. Color the images using the Zig Clean Color Markers listed.
3. The "No Probllama" stamp does not have the defined speech bubble around it, so I drew it in myself with a black PITT pen.
4. Die cut or fussy cut all 4 colored images. I did not have the dies, so I fussy cut them.
5. On a piece of 4" x 5 1/4" Mixed Media White Paper, tape down the Fan Pattern metal stencil.
6. Apply the VersaMagic ink listed from lightest to darkest. I used the Sage to help me blend the colors.
7. Using the Large "L" Fitted Frame, die cut 2 windows vertically in the stenciled background.
8. Create the card base out of light brown cardstock, cut to 4 1/4" x 11."
9. Cut 2 pieces of Bazzill Chocolate cardstock to fit behind the windows, and adhere them to the card base.
10. Cut craft foam and adhere to the back of the stenciled background using On Point Glue.
11. Adhere the stenciled background to the card base with On Point Glue.
12. Adhere the llamas inside the die cut windows, using EZ Runner on their necks, and craft foam to their heads. This makes is look as though they are coming out of the window.
13. Adhere the speech bubbles to the background using the EZ Runner.

These llamas crack me up! And I think it's fun to have them peeking out of the die cut windows. Please be sure to visit the Stampendous Blog to see some of the other Q-Sets that are featured this week. Thanks for stopping by. Have an inspiring day!
Comments
colorado
enjoy your card! The
Llamas look fabulous
in the windows.
Carla from Utah
<3 J
jwoolbright at gmail dot com
HerPeacefulGarden.blogspot.com
Beckie
from Georgia
for super-sweet sentiments.
This card is my style.
thanks for sharing
txmlhl(at)yahoo(dot)com
Illinois