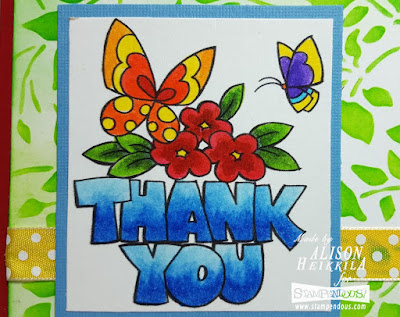
Greetings! This week, the Stampendous team is sharing cards that celebrate Mom! And what better way to do that than with a great big, chunky thank you?

Supplies:
Stampendous:
RS-Q228: Chunky Thank You
FMS4066: Thicket Metal Stencil
STF082: VersaFine Onyx Black Ink Pad
DWNHB-12: 1/2" Stencil Brush
MPW811: Mixed Media White Paper
Other:
Zig Clean Color Markers: 020, 022, 031, 032, 041, 043, 050, 052, 070, 080
My Colors Cardstock: Winter Lake
Imagine: Kalediacolor Ink Pads in Fresh Greens
Canson Mixed Media Paper
Beacon Adhesives: Zip Dry Glue
May Arts Ribbon
Unknown: Red Cardstock
Directions:
1. Stamp the Chunky Thank You with VersaFine ink in Onyx Black on to Canson Mixed Media Paper.
2. Color with the above mentioned Zig Clean Color Markers and trim.
3. Cut a mat of Winter Lake cardstock to add approx 1/4" on each side.
4. Create the card base out of red cardstock cut to the size 5 1/2" x 8."
5. On Stampendous' Mixed Media White Paper, tape down the Thicket stencil.
6. Using Fresh Greens Kaleidacolor and a 1/2" Stencil Brush, apply the 3 middle colors, from lightest to darkest in circular motions all over the stencil. Try not to overblend the colors.
7. Remove the stencil from the paper and brush some additional color around the edges of the paper, varying the tones and keeping the color soft.
8. Add some yellow polka dotted ribbon to the stenciled layer, near the bottom.
9. Glue all layers.


Supplies:
Stampendous:
RS-Q228: Chunky Thank You
FMS4066: Thicket Metal Stencil
STF082: VersaFine Onyx Black Ink Pad
DWNHB-12: 1/2" Stencil Brush
MPW811: Mixed Media White Paper
Other:
Zig Clean Color Markers: 020, 022, 031, 032, 041, 043, 050, 052, 070, 080
My Colors Cardstock: Winter Lake
Imagine: Kalediacolor Ink Pads in Fresh Greens
Canson Mixed Media Paper
Beacon Adhesives: Zip Dry Glue
May Arts Ribbon
Unknown: Red Cardstock

Directions:
1. Stamp the Chunky Thank You with VersaFine ink in Onyx Black on to Canson Mixed Media Paper.
2. Color with the above mentioned Zig Clean Color Markers and trim.
3. Cut a mat of Winter Lake cardstock to add approx 1/4" on each side.
4. Create the card base out of red cardstock cut to the size 5 1/2" x 8."
5. On Stampendous' Mixed Media White Paper, tape down the Thicket stencil.
6. Using Fresh Greens Kaleidacolor and a 1/2" Stencil Brush, apply the 3 middle colors, from lightest to darkest in circular motions all over the stencil. Try not to overblend the colors.
7. Remove the stencil from the paper and brush some additional color around the edges of the paper, varying the tones and keeping the color soft.
8. Add some yellow polka dotted ribbon to the stenciled layer, near the bottom.
9. Glue all layers.

Comments