
Delicata Goes Spooky

Raven-Final

When I first heard that Imagine was going to have a new black Delicata ink, I couldn’t have been more excited. I love anything that shimmers—and I love black. What can I say? Goth girl right here! My style tends to go toward the creepy end of things, so I decided to showcase the new Black Shimmer in that way.
Skill: Intermediate
Time: 45 minutes + drying time
Directions: 2016_may_AH_spooky_step1
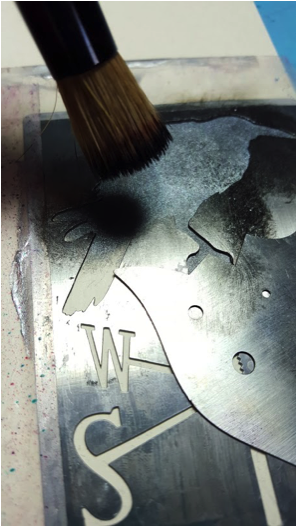
Step 1: Tape the stencil to cream colored cardstock. Using the Picasso Shield, block off part of the ball, where the claws would be. Ink up a stencil brush by rotating it gently on Black Shimmer Delicata. Use the same circular motion to apply the ink to the stencil.
2016_may_AH_spooky_step2
Step 2: Once you finish inking the crow (I gave it 2 coats), use Dark Brown Shimmer Delicata ink in the same way to ink up the weather vane and the ball that the raven is standing on. I used a smaller stencil brush for this part. Flip your Picasso Shield so that you don’t ink on to it’s claws. Wipe down your stencil brush again and apply just a little Celestial Copper Delictata ink to some areas of the weather vane.
2016_may_AH-spooky_step3
Step 3: After the ink dried (which happens pretty quickly), I tore the edges around my raven and inked them with Desert Sand Memento Ink. Next, I sprayed the piece with Original GooseBumps and left this piece off to the side to dry while I worked on my other pieces.
2016_may_AH_spooky_step4a2016_may_AH_spooky_step4b
Step 4: Cut a piece of black cardstock to fit the card base. Rub the cardstock with Black Shimmer, and then with Celestial Copper. I didn’t go too heavy with either color, and I kept it very random.
2016_may_AH_spooky_step5a
Step 5: Run this piece thru a machine in the Gridiron embossing folder. Rub Delicata Silvery Shimmer onto the raised areas.
2016_may_AH_spooky_step5b
Step 6: Spritz the embossed piece with Tuxedo Black irRESISTables spray and Original GooseBumps. Let dry.
Step 7: On the card base, rub Emboss ink on one side, then sprinkle Aged Black Embossing Enamel on. Do not shake off. The Emboss ink won’t hold the chunkier pieces of the mix. The ink is applied just to give some “stick” to the smaller bits. Heat from underneath. Continue to the next side, and repeat until all 4 sides have been embossed.
2016_may_AH_spooky_step7a
Step 8: Attach all of your layers together. I added a sentiment from a scrap piece of Halloween cardstock that I had. I love all of the texture and shine from the various inks, sprays, and enamel that are used. Once everything was glued down, I drew some “stitches” with Tuxedo Black irRESISTables Pico Embellisher.
Alison Heikkila's spooky Delicata card photographed with miniature collectables from The Crow.
Since my favorite movie is The Crow, I decided to photograph my card with some of my memorabilia. 
Supplies
Imagine
Other
  • Stampendous! – Raven Dreamweaver Stencil, Picasso Shield, Aged Black Embossing Enamel, Stencil Brushes
  • Spellbinders – Seth Apter Gridiron Em-bossing Fold’er
  • Sentiment – DCWV
  • Card base
  • Cream cardstock
  • Adhesive

Comments

Creepy Glowbugg said…
I love, love, love this card!! Great tutorial and even better use of those gorgeous products!!
ike said…
Awesome !! That is amazing and I love the photo of the card in it's 'setting' - fabulous :-D xxxx
Suzi McKenzie said…
I love everything about this card, such awesome colours and texture, that black ink looks wicked, might have to treat myself to some of that.
hugs
Suzi
xxx

Popular posts from this blog

Holiday Hop and Collaboration: Day 5

Hello!  All of this week, the  Stampendous  and  Dreamweaver  teams have been playing with a mix of their products, along with some wonderful, SAND-ABLE papers from  Core'dinations . We've sanded our way to the "core" of all things Christmas and the Holiday season. ***If you are looking for my Day 17 post for the 31 Days of Halloween, please scroll down to my next post.*** Of course, there are prizes, and we are giving away the best...this time with a mix of fun  Core'dinations products as well. To be one of three prize package winners, follow the posted link lists from each day, leave comments, and winners will be selected from these comments at the beginning of next week.  I've been sharing a few car featuring the Stampendous set, Forest Friends . It's such a sweet set. I was going through my Dreamweaver Stencils, and I came across the Open X-Mas Tree . Then it came to me. Remember the part in Rudolph the Red-Nosed Reindeer, when the song Silv...

SBS and MIC Collaboration: Day 2!

It's Day 2 of the totally rad Simply B Stamps and Make it Crafty collaboration! If you missed anything yesterday (though I don't know how ya could have missed this!), below is all the info you need to know.  Make it Crafty and Simply Betty Stamps are really excited to be bringing you the combined Hollywood Release! Simply Betty Stamps has a range of characters from Betty Monroe, through to Action Chris the movie director!! Make it Crafty has a range of background scenes perfect to switch and match with your famous characters!! Of course we are going to have heaps of fun with this theme and June 1st & June 2nd we will be showcasing our stuff and then June 3rd we're bringing you a fun guessing game... Will you be able to guess the movie??  We'll be giving you some clues to help!! Join us for the two inspiration days and leave a comment along the way for your chance to win a selection of new images. There will be FOUR winners each day recei...

Echo Park Blog Hop with Imagine

Greetings! This is my second post for the day. This one is not part of the 31 Days of Halloween, but rather a super-duper blog hop that the Artists in Residence for Imagine are doing with Echo Park . So if you're here for my Day 7 project, please check out the post HERE . But before you do that, scroll on to check out this one. There are prizes up for grabs, so be sure to check out the Imagine Blog as well as the Echo Park Blogs for details. I created my background by applying Dandelion and Tangelo Memento Ink to my brayer. Then I sprayed it with Ink Potion No. 9 to help the colors blend and to act as an extender to keep the inks wet longer. After I rolled the colors out on to watercolor paper and let it dry, I stamped the lovely doily-like image from Echo Park's Simply Sweet Stamp Set with Grape Jelly Memento. I also received the super pretty Heart Doily Designer Die  which I used with a true purple cardstock. But it needed something....and in rolls the super fabul...