For the month of February, the Artists in Residence for Imagine are featuring the color rose. I went with a pinky shade of rose for my project today, which features Iridescent Pink Creative Medium as well as Angel Pink Memento. And, I'll show you how to make a Shaker Box, to give your card a little interactive fun.

Supplies:
Imagine:
Memento Markers: Angel Pink, Lulu Lavender, Summer Sky, London Fog, Gray Flannel, New Sprout, Bamboo Leaves, Rose Bud
Creative Medium: Iridescent Pink
VersaFine in Onyx Black
VersaMark Ink Pad
Craft Mat
Spot On Adhesieve
Other:
Lawn Fawn: Baked with Love Stamp and Die Sets
Stampendous: Waves & Dots Stencil, Leopard Skin Stencil, Vintage Pink Embossing Tinsel, Build a Wreath Die Set
The Crafter's Workshop: Stencil Punchinella (stars only)
Tombow Foam Tape
Canson Smooth Bristol Paper
Sequins
Pink & Gray Cardstock
Pink Patterned Cardstock
Directions:

1. Stamp the frosted cupcake, mixer and stand on to Smooth Bristol paper using Versafine ink. Color the images using the colors listed above.
*One thing I wanted to share, is that you do not always have to shade or highlight with the same colors. Meaning, if I want my focal color to be pink, I don't always have to use pink to shade. For the mixer, I used Angel Pink and Rose Bud, which is an obvious choice because they are both pink. But, for the frosting, I used Angel Pink shaded with Lulu Lavender, and the stand is Angel Pink with Summer Sky. You can get some wonderful effects and more exciting colorations by thinking outside the box with what colors you use together.
2. Die cut the images.
3. Using the Build a Wreath Die Cut Set, cut out the largest scallop in pink cardstock. Then, die cut the second largest circle in the middle of the cut scallop.

4. Cut a piece of acetate in the largest scallop.
*Tip! I like to use the plastic sheets from my clear stamps, once I've transferred the stamps into a filing system.
5. Cut the largest circle in a pink patterned cardstock.
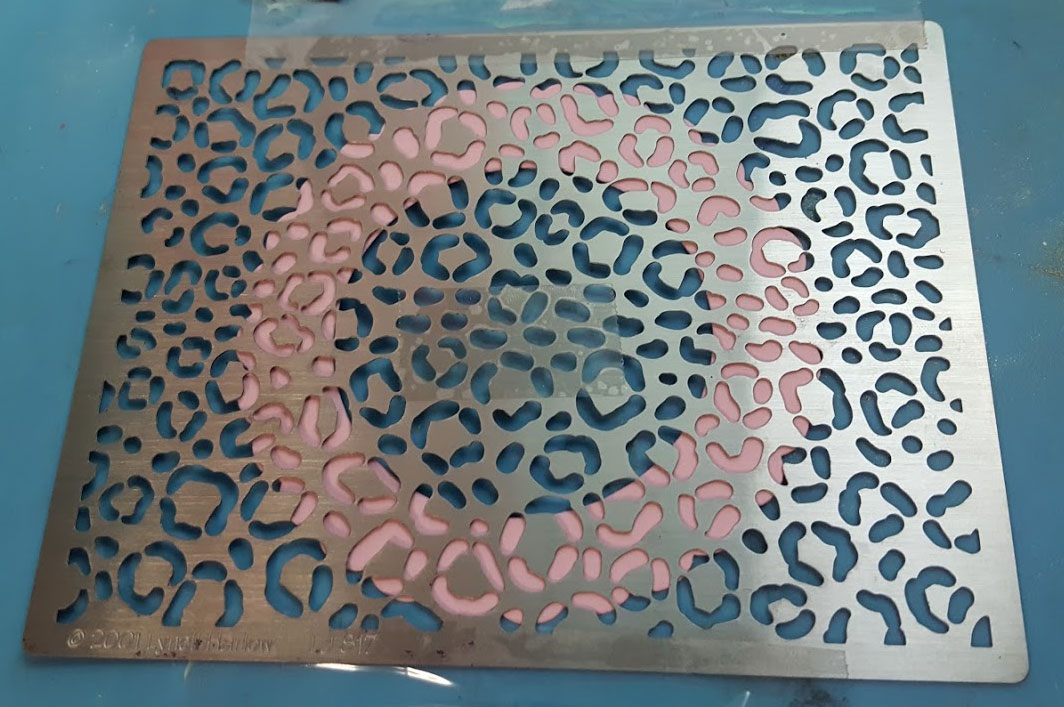
6. Lay the Leopard Stencil on top of the largest scallop. Tape down.

7. Apply Iridescent Pink Creative Medium with a palette knife. The best way to apply, is by glooping (technical term) some CM at the top of the stencil, and then dragging the palette knife across the stencil at a 45 degree angle. Remove the stencil and let the CM dry.

8. Tape down the Stencil Punchinella directly to the Craft Mat. Apply Creative Medium to the stars. Peel off stencil, Let stars dry.

9. Once the stars are dry, peel them off the Craft Mat with the palette knife. Set stars aside. They will be used in our Shaker Box.

10. Using Spot On glue, apply to the back of the scallop with the leopard skin. Adhere to the acetate scallop.

11. Apply foam tape around the scallop layer. Be sure to not have spaces in between the tape so that your shaker filling won't fall out.
12. Fill with sequins and the stars you made from Creative Medium.

13. Apply the patterned paper (pattern side down!) to the back of the Shaker Box.

Ta-da! Shaker Box! Now for the rest of the card.
14. Tape down the Waves & Dots stencil to a piece of gray cardstock. Apply Creative Medium. Remove and wash stencil. Let dry.

15. Swipe Angel Pink ink across smooth white cardstock. Stamp your sentiment using VersaFine ink on top of the Angel Pink. Trim.

16. Apply VersaMark ink across the bottom of the sentiment. Sprinkle Vintage Pink Embossing Tinsel and heat from underneath.

17. On your white card base, apply VersaMark to the 2 vertical (tall) sides of the card. Sprinkle with Vintage Pink Embossing Tinsel and heat from underneath.

18. Adhere the gray mat to the card base. Adhere the Lawn Fawn elements to the Shaker Box with Spot On glue and add extra foam tape where the images overhang for added stability. Adhere Shaker Box to the card.

19. Shake, shake, shake!!!


Thanks for visiting today!

Supplies:
Imagine:
Memento Markers: Angel Pink, Lulu Lavender, Summer Sky, London Fog, Gray Flannel, New Sprout, Bamboo Leaves, Rose Bud
Creative Medium: Iridescent Pink
VersaFine in Onyx Black
VersaMark Ink Pad
Craft Mat
Spot On Adhesieve
Other:
Lawn Fawn: Baked with Love Stamp and Die Sets
Stampendous: Waves & Dots Stencil, Leopard Skin Stencil, Vintage Pink Embossing Tinsel, Build a Wreath Die Set
The Crafter's Workshop: Stencil Punchinella (stars only)
Tombow Foam Tape
Canson Smooth Bristol Paper
Sequins
Pink & Gray Cardstock
Pink Patterned Cardstock
Directions:

1. Stamp the frosted cupcake, mixer and stand on to Smooth Bristol paper using Versafine ink. Color the images using the colors listed above.
*One thing I wanted to share, is that you do not always have to shade or highlight with the same colors. Meaning, if I want my focal color to be pink, I don't always have to use pink to shade. For the mixer, I used Angel Pink and Rose Bud, which is an obvious choice because they are both pink. But, for the frosting, I used Angel Pink shaded with Lulu Lavender, and the stand is Angel Pink with Summer Sky. You can get some wonderful effects and more exciting colorations by thinking outside the box with what colors you use together.
2. Die cut the images.
3. Using the Build a Wreath Die Cut Set, cut out the largest scallop in pink cardstock. Then, die cut the second largest circle in the middle of the cut scallop.

4. Cut a piece of acetate in the largest scallop.
*Tip! I like to use the plastic sheets from my clear stamps, once I've transferred the stamps into a filing system.
5. Cut the largest circle in a pink patterned cardstock.
6. Lay the Leopard Stencil on top of the largest scallop. Tape down.
7. Apply Iridescent Pink Creative Medium with a palette knife. The best way to apply, is by glooping (technical term) some CM at the top of the stencil, and then dragging the palette knife across the stencil at a 45 degree angle. Remove the stencil and let the CM dry.

8. Tape down the Stencil Punchinella directly to the Craft Mat. Apply Creative Medium to the stars. Peel off stencil, Let stars dry.

9. Once the stars are dry, peel them off the Craft Mat with the palette knife. Set stars aside. They will be used in our Shaker Box.

10. Using Spot On glue, apply to the back of the scallop with the leopard skin. Adhere to the acetate scallop.

11. Apply foam tape around the scallop layer. Be sure to not have spaces in between the tape so that your shaker filling won't fall out.
12. Fill with sequins and the stars you made from Creative Medium.

13. Apply the patterned paper (pattern side down!) to the back of the Shaker Box.

Ta-da! Shaker Box! Now for the rest of the card.
14. Tape down the Waves & Dots stencil to a piece of gray cardstock. Apply Creative Medium. Remove and wash stencil. Let dry.

15. Swipe Angel Pink ink across smooth white cardstock. Stamp your sentiment using VersaFine ink on top of the Angel Pink. Trim.

16. Apply VersaMark ink across the bottom of the sentiment. Sprinkle Vintage Pink Embossing Tinsel and heat from underneath.

17. On your white card base, apply VersaMark to the 2 vertical (tall) sides of the card. Sprinkle with Vintage Pink Embossing Tinsel and heat from underneath.

18. Adhere the gray mat to the card base. Adhere the Lawn Fawn elements to the Shaker Box with Spot On glue and add extra foam tape where the images overhang for added stability. Adhere Shaker Box to the card.

19. Shake, shake, shake!!!


Thanks for visiting today!
Comments