Hello! The Imagine Artist in Residence is sharing projects with dogs this month. So I decided to do a scrapbook page featuring my dog Bartles.

Isn't he adorable???
Supplies:
Imagine:
Memento Ink in Rich Cocoa
Sheer Shimmer in Sparkle and Frost
Fireworks! in Pear Tart
Sponge Dauber
Other:
Stampendous: Crusade Stencil
Xyron: Creative Station and Tape Runner
Quik Kutz: Diesel Alpha Dies
May Arts: Twill
Heidi Swapp: Heart Stamp
Prism: Cardstock
Directions:

1. Start by cropping your photos. Choose your background paper by pulling out a color from the photos. I went with an olive green to match Bartles' color. Then choose 2 coordinating additional cardstocks. I went with 2 shades of brown. Tear 1 sheet to a width of about 5." Tear the second color to the width of about 3 1/2."
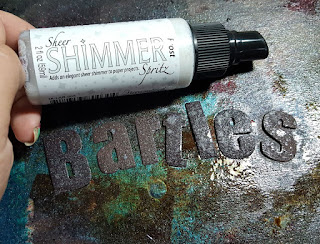
2. Die cut the name of your furry friend, or a cute sentiment. Then, spritz the letters with Frost Shimmer Spritz. Let the letters dry.

3. Tape down a background stencil starting in the corner. Only tape a piece across the top so that you can lift it like it's hinged to see if you like how the ink has been applied. Make sure that the stencil is one that lines up easily with itself so that you can continue the pattern across the page. Using a sponge dauber, apply your ink. I used Rich Cocoa Memento.
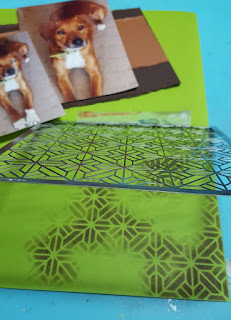
This is how I tape down the stencil. I can easily check to the way the pattern is coming along. I didn't want to go for a solid pattern. I like it broken up. Continue across the entire sheet.

4. Spray the background with Sheer Shimmer Sparkle and let dry. *None of the pieces have been glued down yet.

5. Using twill ribbon, use a paint brush to apply Pear Tart Fireworks! I loved the paw prints on this ribbon. Stamp a heart on the right side of the page. Then, using the straw from the Frost spritzer, apply some Sheer Shimmer to the heart.
6. Glue down the accent cardstock and photos using a Xyron tape runner. Then, using the Creative Station, apply adhesive to the letters and the twill ribbon. Apply all of your pieces and you're done!


Isn't he adorable???
Supplies:
Imagine:
Memento Ink in Rich Cocoa
Sheer Shimmer in Sparkle and Frost
Fireworks! in Pear Tart
Sponge Dauber
Other:
Stampendous: Crusade Stencil
Xyron: Creative Station and Tape Runner
Quik Kutz: Diesel Alpha Dies
May Arts: Twill
Heidi Swapp: Heart Stamp
Prism: Cardstock
Directions:

1. Start by cropping your photos. Choose your background paper by pulling out a color from the photos. I went with an olive green to match Bartles' color. Then choose 2 coordinating additional cardstocks. I went with 2 shades of brown. Tear 1 sheet to a width of about 5." Tear the second color to the width of about 3 1/2."

2. Die cut the name of your furry friend, or a cute sentiment. Then, spritz the letters with Frost Shimmer Spritz. Let the letters dry.

3. Tape down a background stencil starting in the corner. Only tape a piece across the top so that you can lift it like it's hinged to see if you like how the ink has been applied. Make sure that the stencil is one that lines up easily with itself so that you can continue the pattern across the page. Using a sponge dauber, apply your ink. I used Rich Cocoa Memento.

This is how I tape down the stencil. I can easily check to the way the pattern is coming along. I didn't want to go for a solid pattern. I like it broken up. Continue across the entire sheet.

4. Spray the background with Sheer Shimmer Sparkle and let dry. *None of the pieces have been glued down yet.

5. Using twill ribbon, use a paint brush to apply Pear Tart Fireworks! I loved the paw prints on this ribbon. Stamp a heart on the right side of the page. Then, using the straw from the Frost spritzer, apply some Sheer Shimmer to the heart.
6. Glue down the accent cardstock and photos using a Xyron tape runner. Then, using the Creative Station, apply adhesive to the letters and the twill ribbon. Apply all of your pieces and you're done!

Comments