Greetings! I am so excited about my card today. This isn't for any challenge, or any Design Team...it's just because I was inspired and I had to make it. So I have totally fallen in love with the Gina K Wreath Builder Templates. I have seen a lot of beautiful wreaths with flowers and greenery from many people, but I wanted to step out of the box. Way out. The Wreath Builder Templates are perfect for making really cool cards for Halloween. I have a bunch made/in the works already, but this was my first, and i really love it.

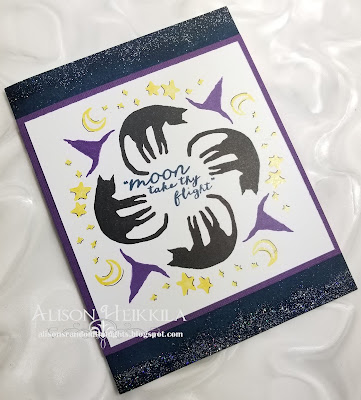
I adore Hero Art's Luna the Halloween Cat stamp set. I love it's simplicity, it's elegance, and of course, all of the imagery. So I chose one of the lovely cats, and began to build my "wreath." I used VersaFine Clair in Nocturne to get a deep black, solid image. Then I moved on to the hats, and used Fantasia ink, also in VersaFine Clair. Of course, I also needed some moons and stars, and they were stamped with Brilliance ink in Sunflower. My sentiment was made with a sentiment that is from the Dreams are Made stamp set, also from Hero Arts. The sentiment was stamped with Twilight VersaFine Clair.

I made a thin mat of purple cardstock and mounted both pieces on a deep blue cardstock. I needed some sparkle on the card, so I applied some VersaMagic to the top and bottom of the card, applying the ink heavier towards the edge. Then, I sprinkled on Stardust embossing powder from Stampendous, and heat set it. I also added a few thin black lines for detail on the moons and stars.
I love how this turned out. I can imagine doing all sorts of unusual "wreaths" with the fantastic Templates from Gina K. I will be sharing a few during the month of October. But, I'll probably have at least one more before that! I am having so much fun with building wreaths.

I'll be back tomorrow with a new project for Doodles Paper Playground. I hope you'll be back to check it out. Thanks so much for stopping by. Have an inspiring day!

I adore Hero Art's Luna the Halloween Cat stamp set. I love it's simplicity, it's elegance, and of course, all of the imagery. So I chose one of the lovely cats, and began to build my "wreath." I used VersaFine Clair in Nocturne to get a deep black, solid image. Then I moved on to the hats, and used Fantasia ink, also in VersaFine Clair. Of course, I also needed some moons and stars, and they were stamped with Brilliance ink in Sunflower. My sentiment was made with a sentiment that is from the Dreams are Made stamp set, also from Hero Arts. The sentiment was stamped with Twilight VersaFine Clair.

I made a thin mat of purple cardstock and mounted both pieces on a deep blue cardstock. I needed some sparkle on the card, so I applied some VersaMagic to the top and bottom of the card, applying the ink heavier towards the edge. Then, I sprinkled on Stardust embossing powder from Stampendous, and heat set it. I also added a few thin black lines for detail on the moons and stars.

I love how this turned out. I can imagine doing all sorts of unusual "wreaths" with the fantastic Templates from Gina K. I will be sharing a few during the month of October. But, I'll probably have at least one more before that! I am having so much fun with building wreaths.

I'll be back tomorrow with a new project for Doodles Paper Playground. I hope you'll be back to check it out. Thanks so much for stopping by. Have an inspiring day!
Comments
Fantastic wreath.
thanks for sharing
txmlhl(at)yahoo(dot)com