
Fun with Fireworks!


Fireworks! are fun to spritz, but there are other things you can do with them. My project today will give you some examples.

Directions:
2016_apr_AH_fireworks_step1


1. I started off with 2 coordinating stencils- a background, patterned stencil, and a singular large image stencil. In this case, it was a heart. I taped down my watercolor paper(only on top, to create a hinge), then the background stencil, and then my heart stencil. 
2016_apr_AH_fireworks_step2


2. Grab your Fireworks spray and let’s get spritizing! But wait! Don’t spray your stencils. This time, we are going to spray our Craft Mat and use sponge daubers to apply the color. Make sure you shake up your Fireworks! before you spray them on to your craft mat.

2016_apr_AH_fireworks_step3a   2016_apr_AH_fireworks_step3b   2016_apr_AH_fireworks_step3c


3. Using your sponge daubers, start to apply the colors to the watercolor paper. Fireworks! dry quickly, so you will want to work fast, but you can always go back and apply more to blend the colors better. I had my tape set up as a hinge so that I can peek underneath the stencils to see if I was happy with the coverage. The result is a pretty, shimmery blended rainbow.
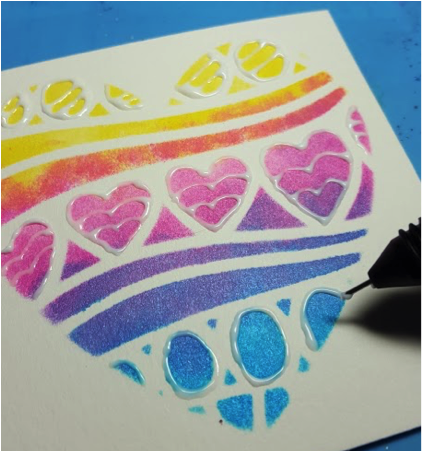
 2016_apr_AH_fireworks_step4a

4. Next, I added some definition and extra designs to the completed heart by using irRESISTables Pico Embellisher in Wedding Dress. I outlined a lot of the areas, but I also doodled a bit. I let the irRESISTables dry, and then I cut out the heart.
2016_apr_AH_fireworks_step5

5. I took my card base and spritzed the same 3 colors of Fireworks! on to it, spraying from the center out. Those large splotches in the center won’t show. I let this dry. 

2016_apr_AH_fireworks_step6

6. I cut out a large circle of pink cardstock, and I unscrewed the cap of the Bahama Blue Fireworks! You can see in the photo above that I touched the bottom of the “straw” of the nozzle to the circle, and then I dragged it down. I redipped the straw into the liquid fairly frequently and put lots of these shimmery, semi-random lines all over the top of the circle.
2016_apr_AH_fireworks_step7 

7. I then glued the circle to the card base, and then attached the heart using adhesive foam for some dimension. I stamped a fun sentiment using Bahama Blue Memento ink, and then voila! I was done! So that’s 3 fun ways to use Fireworks!

Supplies:
Imagine
Other
  • Stampendous – Heart Stencil Duo set
  • Inkadinkado – Sentiment Stamp
  • Artist’s Loft – Watercolor Paper
  • Cardstock and card base

Comments

Karen P said…
A really gorgeous card and what a fantastic technique! Stencil layering is new to me but is something I now have to try. Am wondering what Dreamweaver stencils I own that I can try this with. Thanks for sharing Karen x

Popular posts from this blog

Mediterranean Dreams Shaker

Hello! Today I have a card that features the Mediterranean Dreams Subscription Kit from White Rose Crafts.  This fabulous Subscription Kit brings together sparkling, azure Mediterranean seas, sun-bleached shores and the rich colors of vibrant Mediterranean cultures in a carefully curated kit. I knew I just had to try the Jillibean Soup shaker card and I chose to use one of the stamps (from Kaisercraft) to make my background. I stamped the seashell with Tea Dye Distress Oxide all over the background of the card. Then I applied some Walnut Stain Distress Oxide to my craft mat, spritzed it with some water, and splattered it on to my card base. Last, I inked the edges with Salty Ocean Distress Oxide with a Mini Blending Brush. For my sentiment, I die cut a stitched rectangle from my stash, out of the pearly yellow cardstock that came in the kit and stamped it with "Wish You Were Here" stamp from the same "Summer Splash" stamp set, with StazOn Pigment ink. And ...

Our Favorites: ADfD Blog Hop

***Sorry for the late posting....Blogger doesn't always play nice! Today is the first day of our  ADFD Blog Hop  - a celebration of all of the beautiful images Tammy has created over the years. As a special surprise for Tammy, we have a combination of current and former DT members participating in the hop. Her inspiring art and generous heart have touched us all. We want to take a moment to show our gratitude and thank Tammy for the blessings and joys we have received as members of the ADFD DT. Our theme is “A Collection of ADFD Favorites” - so each DT member’s blog you visit will share something she has created with one of her favorite ADFD images.  The hop has   hidden prizes  - a commenter from each hidden prize stop will win a choice of one image from the ADFD Shop ! You won’t know where the prizes are hidden, so be sure to leave a comment at each stop of the Hop!  Our Blog Hop will run from 7:00 a.m. eastern standard time on Saturday, February 25,...

Echo Park Blog Hop with Imagine

Greetings! This is my second post for the day. This one is not part of the 31 Days of Halloween, but rather a super-duper blog hop that the Artists in Residence for Imagine are doing with Echo Park . So if you're here for my Day 7 project, please check out the post HERE . But before you do that, scroll on to check out this one. There are prizes up for grabs, so be sure to check out the Imagine Blog as well as the Echo Park Blogs for details. I created my background by applying Dandelion and Tangelo Memento Ink to my brayer. Then I sprayed it with Ink Potion No. 9 to help the colors blend and to act as an extender to keep the inks wet longer. After I rolled the colors out on to watercolor paper and let it dry, I stamped the lovely doily-like image from Echo Park's Simply Sweet Stamp Set with Grape Jelly Memento. I also received the super pretty Heart Doily Designer Die  which I used with a true purple cardstock. But it needed something....and in rolls the super fabul...