
Jack O Lanterns and Trees

Hello! The Stampendous Design Team is gearing up for a fun blog hop with Tombow.  Today, I am going show a project with the Zero Drawing Technique to you.

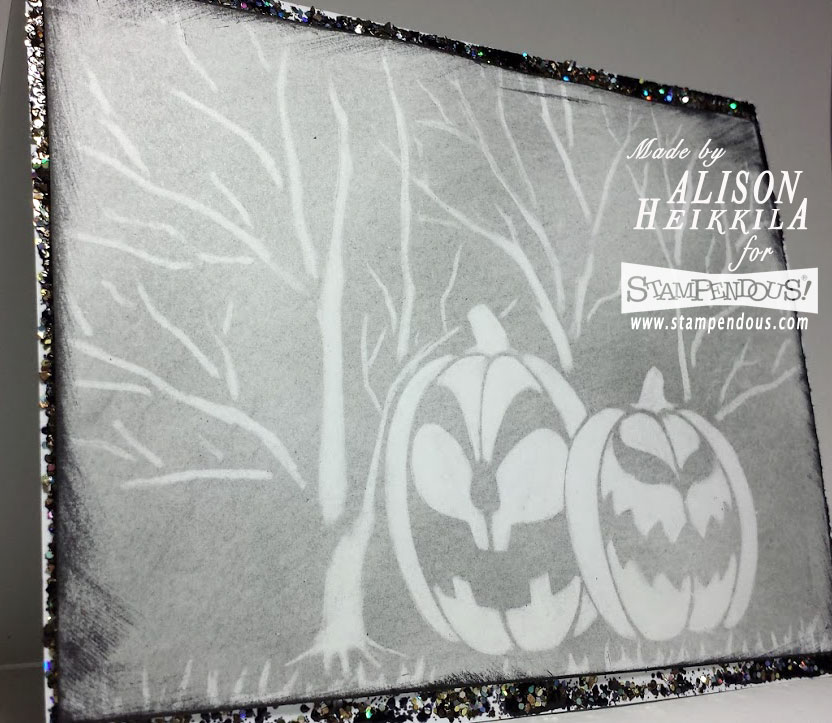
You may have seen me use this technique a couple of weeks ago, with the same beautiful Leafless Tree from Dreamweaver, and other pumpkins. But this time, I decided to go a bit spookier and use these Jack O Lanterns.

This is a very simple technique with awesome results, and you can learn how to do it by watching this video HERE. This is perfect if you need a card in a pinch,and just don't feel like coloring. You'll definitely want to pick up the MONO Zero Round Eraser if you decide to try this technique. The eraser is so small and can get into such teeny crevices of your stencils. Plus, you can easily draw with it. It's a great eraser!

I used Spoonful of Midnight Embossing Powder and Elements around the edge of my card base. I also added a bit of opaque black embossing powder in addition to what's in the Spoonful because I wanted to make sure that the edge had decent coverage. Spoonful of midnight has such beautiful glitter in it!

The Stampendous Blog will be posting a full link list tomorrow, so out all of the folks listed below will be showing their projects today. So please be sure to check in with them on 9/16/15. Thanks for stopping by. Have an inspiring day!

Comments

Stampendous said…
This is fantastic! So spooky and mysterious use of the zero pencil technique! Thank you for sharing today!
Dee said…
Spooky- terrific use of the zero eraser technique!
Lyn Bernatovich said…
Fun zero eraser card Alison!
Viki Banaszak said…
Well now theres the real Alison that I have seen before. So spooky and delightful. I love how the pencil just gives that smokey, foggy type look to the background.
There is something so ethereal and spooky about this technique!!! I am so in love with it and am going to be giving it a try as soon as I get a pencil that has lead in it!! LOL I am thinking that shaving colored pencils and doing this might look equally awesome!!! I have those so I may just have to try it!!! YEP! Off to my craft room to give it a go!! Thanks for the inspiration!
Mary Holshouser said…
Amazing. A new technique that I have to try.
Hope I can get a finished product like yours.
thanks for sharing
Illinois
D.Ann C said…
What a nifty technique! Florida
Sue D said…
Very cool technique and perfect for this card.
Sue in Ohio
TracyM #6773 said…
BOO-tiful card!!!
WOW - this really is an EXCITING technique, THANK YOU for sharing!!!
Tracy from Victoria, Australia

Popular posts from this blog

February Smeared & Smudged Sketch Challenge

The new Smeared & Smudged challenges are up and ready for you to participate in! I got instantly inspired by Kelli’s card sketch for the month, as I have been working with different ideas for my next “Tarot Card.” Haha! That’s actually pretty funny! If you’ve been checking in over the past couple of weeks, you may have seen my Misty Benson Tarot Set 1 ( Smeared Ink ) cards. I’ve used The World and The Fool so far. Today, I bring you Death. Don’t worry…it’s actually a joyful image…one that I intend to use a lot! First, here’s the sketch. I flipped it and changed the ribbon and embellishment a bit. Can I just start off by saying that it is quite nerve wracking to slice your image??? I have done it a few times in the past, but I always get butterflies when I attempt it again. I colored the image and the card itself using nothing but Distress Inks and my Cut-n-Dry Nibs. My skull button at the top has been colored with Alcohol Inks.   The colors look a little off to m

Christmas in July with Imagine Crafts & Stencil Girl!

Hello! Have you heard? The Imagine AIRs have been hopping with Stencil Girl! If you have been here before, you know I loooove me some stencils, so this collaboration was very exciting for me! The teams are hopping for 3 consecutive Saturdays, and this is week 2. I have the entire list of hop links at the bottom of the post. Be sure you don't miss anyone! I decided to to create an extra large gift tag with my new stencils. Using red cardstock, I taped down the Journal Texture #8 Stencil  and inked it up with Golden Glitz Delicata ink . I promise you, this is the BEST gold ink you will ever use! The Journal stamp only has 2 diamonds on it (it's a 4x4" stencil), so after I inked up the first pair, I moved over the stencil, lined it up, and inked again. Next I wanted to do something textural with the Urban Insiders Star . So I took some evergreen cardstock, taped down the star, and slathered on some yummy Iridescent Green Creative Medium . After the medium dried, I ga

House Mouse Hop: Nurse Mouse

Hello! I am excited to bring you my first of two posts today. This post is for the House Mouse & Friends Blog Hop. My second will be for Aurora Wings. You can click HERE to see that post. But don't leave yet! Read to the bottom of my post to find out how you can have a shot at winningMy House Mouse project features the adorable Nurse Mouse stamp. My full instructions and supply list is below. Supplies: Stampendous : HMP62 : Nurse Mouse DWLX7026 : Chevron Stencil STF082: VersaFine Onyx Black Ink Others : My Colors Cardstock : Ocean Side Zig Clean Color Markers: 010, 020, 024, 028, 029, 050, 052, 064, 065, 069, 071, 072, 090, 091, 092, 094, 095, 096, 098, 222, 260, 302, 900, 901, 902 Imagine: Silver irRESISTable Pico Embellisher, StazOn White Opaque, Sponge Dauber Canson Mixed Media Cardstock Ranger: Water Brush Beacon Adhesives : Zip Dry Glue Red Cardstock: unknown Directions: 1. Stamp the image with VersaFine on to Mixed Media paper. This paper holds wa