
Balloon Stencil Duo

Greetings! This week, there are lots of cool things happening at Stampendous (as usual!), and to start the week off, a few of us are sharing the brand-spankin' new Stencil Duos. You get 2 fab stencils, blank cards, and a wonderful pen all in one kit! There are 6 versions available, and they are all great! I used the Balloon Duo Stencil Set for my card, and it was so much fun to work with!

I started off by taping my stencils down on to watercolor paper, and then I applied embossing ink. I heat embossed the stunning Marcasite embossing powder next. It has beautiful swirls of black, silver, and a touch of glitter.


I also used the bottom half of the Incredible You stamp, and I embossed it with Shabby White embossing powder. I used some lovely black, fiberous cardstock that has glitter embedded in it, which added to the fancy look I was trying to give this card. I also added some gold glitter for the balloon's string.

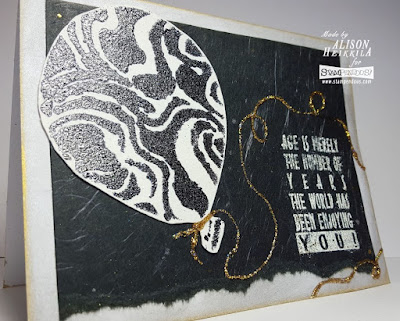
I edged my card base with Shimmery Silver and Golden Glitz Delicata ink from Imagine Crafts. I wish you could see it in person. The whole card shines in a very festive and chic way. Please visit the other blogs listed below, and leave some love! And be sure to check back later this week for lots more with the new Stencil Duos. Thanks for stopping by. Have an inspiring day!

Alison Heikkila (that's me!)


Comments

LOVELOVELOVE that you used a black and white color palette! This is a gorgeous card and I cannot wait to get my hands on the Stencil Duos!! Twice the fun! TFS!
Viki Banaszak said…
That is super cool! I love that saying. I need to add it to my collection.
Stampendous said…
I think I'm in love with the zebra style balloon and that winding string around the sentiment. LOVE this design. Thank you for sharing today!
Mary Holshouser said…
this would make a great design for a hot air balloon.
thanks for sharing a wonderful design.
Purple Diva 6 said…
I love doing balloons on my cards but they are always plain and I love the embossing on this when will it be available here in Australia please...
Jean said…
Simply wonderful!! LOVING this set!

Popular posts from this blog

Christmas in July with Imagine Crafts & Stencil Girl!

Hello! Have you heard? The Imagine AIRs have been hopping with Stencil Girl! If you have been here before, you know I loooove me some stencils, so this collaboration was very exciting for me! The teams are hopping for 3 consecutive Saturdays, and this is week 2. I have the entire list of hop links at the bottom of the post. Be sure you don't miss anyone! I decided to to create an extra large gift tag with my new stencils. Using red cardstock, I taped down the Journal Texture #8 Stencil  and inked it up with Golden Glitz Delicata ink . I promise you, this is the BEST gold ink you will ever use! The Journal stamp only has 2 diamonds on it (it's a 4x4" stencil), so after I inked up the first pair, I moved over the stencil, lined it up, and inked again. Next I wanted to do something textural with the Urban Insiders Star . So I took some evergreen cardstock, taped down the star, and slathered on some yummy Iridescent Green Creative Medium . After the medium dried, I ga

Deco Art and Andy Skinner Hop

This is a very exciting week for the Stampendous team! We are hanging out with the ultra cool Deco Art Mixed Media team, each using each other's products to share some incredible creations with you. These companies go hand in hand, so using each other's products is easy. And the results are amazing. We are of course featuring Andy Skinner's stamps, who is the DecoArt International Education Coordinator.  And yup, there are prizes! But I want you to go to the Stampendous Blog for all of that info. The link is at the bottom of the post. Now, on to my project. I made a cool wall hanging today. I started off with a piece of MDF and I drilled 2 holes, and covered it with DecoArt's white Gesso. After it dried, I used Andy's Alcohol and Media fluid Acrylics Layering Technique. You can check out his how-to video HERE . Needless to say, it's a great technique, and I loved doing it. Once I finished with the aforementioned technique, I sealed the piece w

Changes

Greetings! I don't have a project to share with you today, but rather, an announcement. I have decided to completely revamp my blog, and move it to a new site. I've been blogging at 21st Century Pillow Book for over 10 years now, and it's been wonderful. But the "Pillow Book" aspect got lost somewhere along the way. If you don't know what that is, read my description in the blog header, or do a quick search. They are really very cool. Anyway, I thought it was due time for me to work on a new blog, more of a brand, etc. So, I invite you to now join me over at alisonheikkila.com . I've still got some polishing up to do, and a whole lot of learning, as WordPress is completely different from Blogger, but I am really excited for this new site. I've wanted to do this for a long time, and I am happy to finally be getting it done. Bear with me as I figure out the best way to make it all look and flow. I thankfully have some help with that. But I think you