
Bed Head Lady

Hello! I have a card featuring A Day for Daises today. In case you didn't know, we are now doing a single monthly challenge, and the Design Team will be sharing various projects throughout the month over on the ADfD blog.

When I first saw this image (her name is Bed Head Lady), it immediately reminded me of Lucille Ball. She was gorgeous and hilarious, and I could just imagine a skit beginning with stumbling around after getting out of bed yelling to Dezi, "I'm up. What more do you want." I colored her with Zig Clean Color markers.
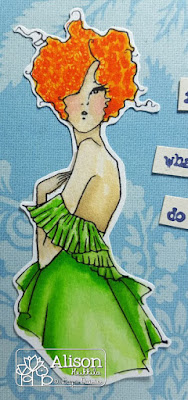
I've got to say, I think these Zigs are my new favorite markers. You can create so many fantastic effects with them. For my sentiment, I used words from the now-closed (sadly) Smeared Ink set, Lil Grumpies. I used Night Sky VersaMark ink from Imagine. I didn't have a "more" stamp, so I cut one from a K. & Co. paper sentiment.

I inked the edges with Desert Sand Memento ink, also from Imagine, and my rik-rak is from May Arts. That's it for me today, but I'll have another A Day for Daisies project to share with you tomorrow. Thanks for stopping by. Have an inspiring day!

Comments

Christine said…
Love this card! Love the colour and the sentiment - brill!
The image in the shop did nothing for me but now you have brought it to life .... and, coloured differently, could be my grandaughter LOL
Thanks for sharing.
x

Popular posts from this blog

Holiday Hop and Collaboration: Day 5

Hello!  All of this week, the  Stampendous  and  Dreamweaver  teams have been playing with a mix of their products, along with some wonderful, SAND-ABLE papers from  Core'dinations . We've sanded our way to the "core" of all things Christmas and the Holiday season. ***If you are looking for my Day 17 post for the 31 Days of Halloween, please scroll down to my next post.*** Of course, there are prizes, and we are giving away the best...this time with a mix of fun  Core'dinations products as well. To be one of three prize package winners, follow the posted link lists from each day, leave comments, and winners will be selected from these comments at the beginning of next week.  I've been sharing a few car featuring the Stampendous set, Forest Friends . It's such a sweet set. I was going through my Dreamweaver Stencils, and I came across the Open X-Mas Tree . Then it came to me. Remember the part in Rudolph the Red-Nosed Reindeer, when the song Silv...

Echo Park Blog Hop with Imagine

Greetings! This is my second post for the day. This one is not part of the 31 Days of Halloween, but rather a super-duper blog hop that the Artists in Residence for Imagine are doing with Echo Park . So if you're here for my Day 7 project, please check out the post HERE . But before you do that, scroll on to check out this one. There are prizes up for grabs, so be sure to check out the Imagine Blog as well as the Echo Park Blogs for details. I created my background by applying Dandelion and Tangelo Memento Ink to my brayer. Then I sprayed it with Ink Potion No. 9 to help the colors blend and to act as an extender to keep the inks wet longer. After I rolled the colors out on to watercolor paper and let it dry, I stamped the lovely doily-like image from Echo Park's Simply Sweet Stamp Set with Grape Jelly Memento. I also received the super pretty Heart Doily Designer Die  which I used with a true purple cardstock. But it needed something....and in rolls the super fabul...

Deco Art and Andy Skinner Blog Hop Finale

Hello! It's time for the finale of the DecoArt and Stampendous blog hop. Have you enjoyed yourself this week? I bet you've got some new techniques that you want to try. I know I do! I am super stoked about my project for today. And it solves a dilemma that we've had in my kids' room for a while. What you see above is 2 pieces of PVC. And some fab DecoArt Media Fluid Acrylics ! So, what am I doing with PVC, you ask? Well, my mom bought my son a light saber(Darth Vader's) for Christmas, and he wanted to display it, but we weren't really sure where in his room, and how. I wanted something cooler than hooks, and we thought it would be neat to have the light saber vertical, instead of horizontal. Plus, there was a fab spot for it if it hung in that direction. So, my husband came up with the PVC pip idea, and I altered the pieces. The end cap holds the base, and the small piece of pipe holds up near the end. And the 2 pieces are spaced out enough so that...