Hello! This week the Artists in Residence for Imagine have been hopping along with Xyron. Xyron, as I am sure you know, makes amazing adhesives plus the coolest and best machines out there to apply them. Home made stickers galore!!! I got to use my 9" Creative Station for the project I am sharing with you today. Check it out.

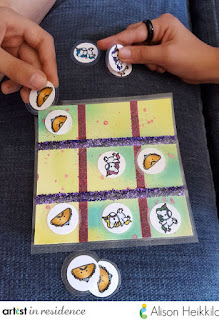
I decided to make a travel Tic Tac Toe game for my kids. Using the 5" laminating cartridge in the Creative Station allowed me to make the game spill proof and strong.
I sprayed a pale yellow cardstock with some shimmery Fireworks! sprays in Rose Bud and Bahama Blue. After the sprays dried, I applied some Tear It! Tape and some yummy Stampendous! glitter to make the boxes. Then, I ran it through my Creative Station, which you can see below.

Now on to the game pieces! I let my kids choose what stamps they wanted me to use for their game pieces. I gave them the retired Just Icons set from Sweet Stamps Shop because the sizes were perfect. My daughter chose the unicorn (no surprise), and my son chose the mustached taco (not too much of a surprise, though I thought that he was going to pick the underwear). I stamped out the images on to smooth, white cardstock and colored them with Memento Markers. Then, I used a 1" punch to cut them out.

I'll admit, running these babies through the Creative Station wasn't easy...but I did get it to work. They're just so teeny, you had to really make sure that they started to roll though, and were not touching each other.

Then, I just cut around each game piece. Now the game was ready to be played!

The board is small enough to fit in a sandwich sized baggie, with all of it's pieces. So it's perfect for travelling. These would be really cute to make as party favors! Thanks for stopping by. Have an inspiring day!

I decided to make a travel Tic Tac Toe game for my kids. Using the 5" laminating cartridge in the Creative Station allowed me to make the game spill proof and strong.
I sprayed a pale yellow cardstock with some shimmery Fireworks! sprays in Rose Bud and Bahama Blue. After the sprays dried, I applied some Tear It! Tape and some yummy Stampendous! glitter to make the boxes. Then, I ran it through my Creative Station, which you can see below.

Now on to the game pieces! I let my kids choose what stamps they wanted me to use for their game pieces. I gave them the retired Just Icons set from Sweet Stamps Shop because the sizes were perfect. My daughter chose the unicorn (no surprise), and my son chose the mustached taco (not too much of a surprise, though I thought that he was going to pick the underwear). I stamped out the images on to smooth, white cardstock and colored them with Memento Markers. Then, I used a 1" punch to cut them out.

I'll admit, running these babies through the Creative Station wasn't easy...but I did get it to work. They're just so teeny, you had to really make sure that they started to roll though, and were not touching each other.

Then, I just cut around each game piece. Now the game was ready to be played!


The board is small enough to fit in a sandwich sized baggie, with all of it's pieces. So it's perfect for travelling. These would be really cute to make as party favors! Thanks for stopping by. Have an inspiring day!
Comments